Details for printing receipts, records, labels, hold slips and other print related functions in the WorkFlows client.
- Ensure that your receipt printer is connected to the computer and all necessary Windows drivers have been installed. Some receipt printers may require drivers from the manufacturer's website.
- Test your printer's connection by opening Printers & Scanners within Windows, selecting the receipt printer, and opening "Manage your device." Here, you'll find the 'Print a test page' button.
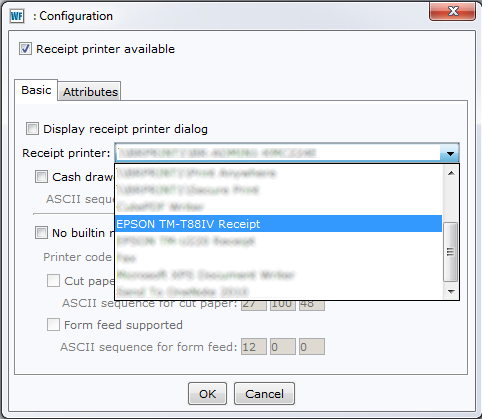
- With the printer connected and tested, open WorkFlows and choose Preference>Peripherals>Receipt Printer from the top menu bar. Check the 'Receipt printer available' box.
- Once that has been selected, a dropdown will display with all available printers. Select your preferred printer and click 'OK'.
Important notes:
- Due to a known bug in WorkFlows, checking 'Display receipt printer dialog' may result in the WF client freezing. Leaving this unchecked will ensure that all of your receipts will print automatically.
- Printers are defined in the Windows user profile and must be configured for each unique Windows user.
- Running group policy or other software that restricts modifying Windows user profiles, ensure system is 'unfrozen' before configuring printers.
With your general user printer already installed and configured in Windows, general printer configuration is available under File > Print Setup and File > Page Setup.
Printing records
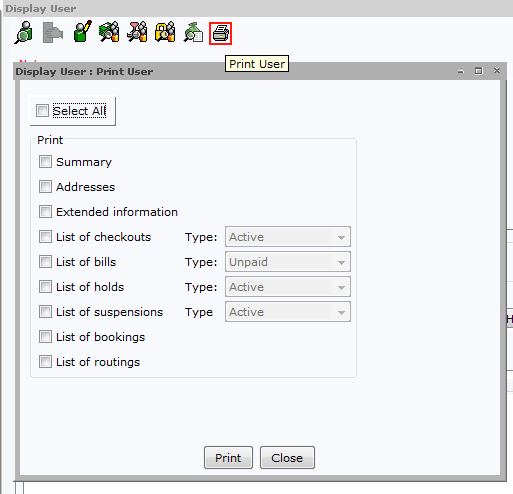
- Display the item or user record you’d like to print.
- Click the printer icon at the top of the record, select the items you’d like to print, and click the “print” button.
- The Windows print dialog will display. Your Windows default printer will be displayed, but any other Windows-installed printer is also an option.
Printing reports
- Open the reports tab, select your default report viewer application (Notepad++, WordPad or NotePad are adequate for this purpose)
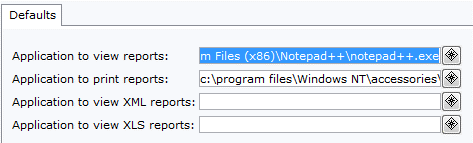
- Run and open the report you’d like to print, then click print. Select the checkbox preferences and click 'PC print'. This will open the windows print dialog, Do not select 'System Print' as this feature is not supported.

You can use a preconfigured label template to quickly print spine labels.

- When in item search and display (under the Circulation tab)…
- Search for an item > click the item > click detailed display > click the call number item tab > select the barcode item, print icons will now be available at the top of the window. The print icon on the right will allow you to print a spine label for the selected item.
- A pop-up will prompt for a default label template to be defined, click “yes”
- Select the default template that you’ve created or from SWAN’s selection. Then the Windows print dialog will display.
As a note, if your label prints blotchy or light, open the driver configuration and increase the darkness of the label.
To create a custom spine label, please refer to the Custom Labels section.
Libraries that would like to create their own label templates or edit templates they’ve previously created can use the WorkFlows Label Designer. This is available in the Cataloging toolbar. Label Designer should only be used to create or edit templates made by the library. Do not edit or remove templates created by SWAN or templates that do not belong to your library. If you need assistance creating a custom label, please open a support ticket.
With your spine label printer installed and configured in Windows, open the WF cataloging toolbar, open Label Designer, add your label or select one of the available templates to modify.


Libraries that use hold wrappers will need to define the re-stick printer in WorkFlows. Restick printers are defined using the ‘Receipt Printer’ configuration. Hold wrapper templates have been defined by SWAN and will be assigned based on feedback from each member library. Libraries that print hold wraps will have this feature enabled in your preferences file. The only configuration required is choosing the desired printer.
With your restick printer already installed and configured in Windows:
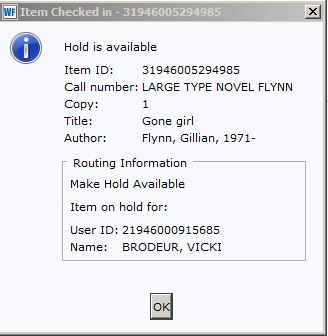
- When checking-in material, hold wrappers will print to the defined receipt printer.
Please note: Due to limitations of WorkFlows, individual printers for receipts and hold-wraps cannot be defined separately. If your staff workstation serves both checkout and checkin functions, the receipt printer will need to be redefined when printing hold wrappers and changed back for standard receipts.