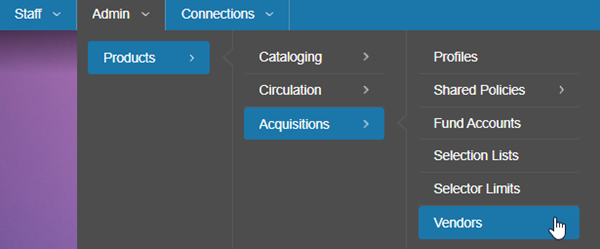
Access vendor records by navigating to Admin > Products > Acquisitions > Vendors.
Add a vendor record
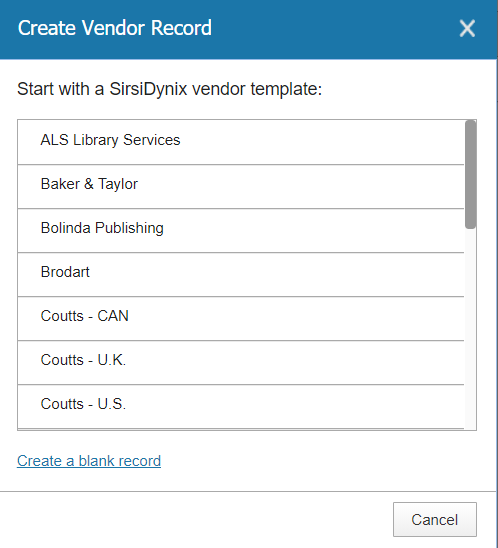
- Click the Create Vendor Record button.

- SirsiDynix has configured several vendor record templates to speed up the vendor creation process. Select a vendor template from the list to auto-fill some fields, such as vendor SAN, or click Create a blank record to avoid using a template.
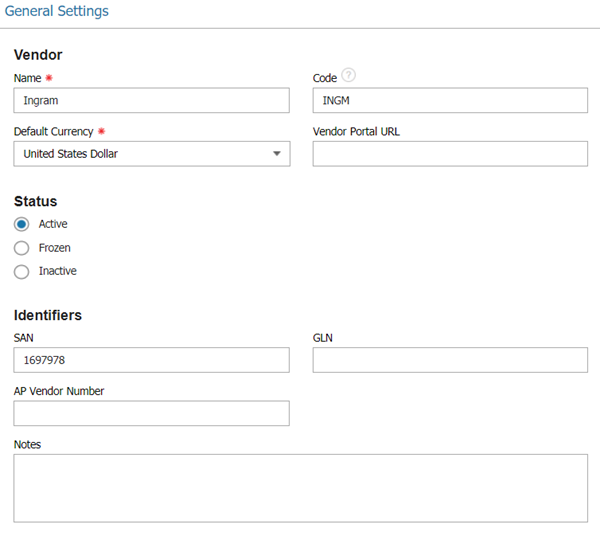
- Only the General Settings tab will be active. Fill out the fields of the General Settings tab.
- Name: descriptive name for your vendor
-
Code: ID or code to represent your vendor
The code can be alpha or alphanumeric but not strictly numeric. The 9xx Import process uses the vendor code to link orders to vendors.
-
Default Currency: value defaults based on settings in your library acquisitions profile
The default currency cannot be changed once the vendor record is saved.
-
Vendor Portal URL: the full URL for your vendor's ordering portal
URLs entered here will display under the Access Vendor Portals button on the acquisitons ordering home page.
- Status: the status of the vendor record
-
SAN: your vendor's Standard Address Number (SAN)
The vendor SAN is required for EDIFACT.
- GLN: Global Location Number (GLN) - used for publishers
- AP Vendor Number: the accounts payable number your business or accounting office uses to identify the vendor
- Click Create.
- Click on the Accounts tab to add an account. At least one account is required in order to order and pay for materials.
- Click the Create Account button.

- Fill out fields for the Account.
-
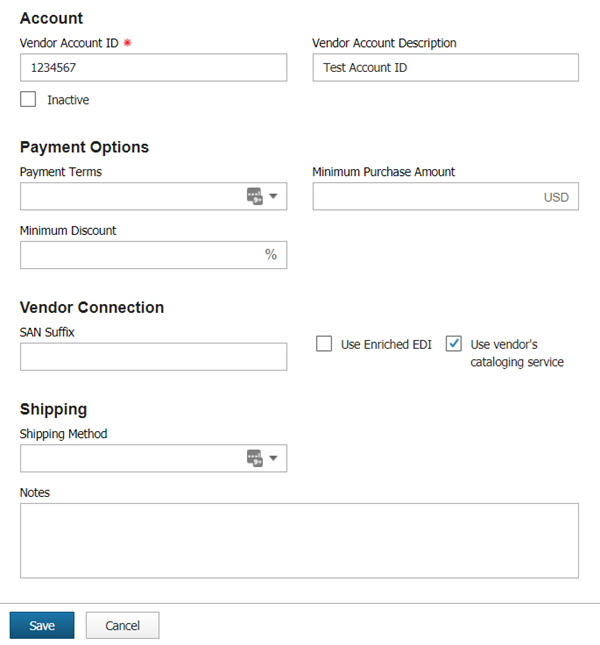
Vendor Account ID: the vendor-assigned ID for your account
This field is required for EDIFACT and must match your library Standard Address Number (SAN).
- Vendor Account Description: descriptive name for your account
- Payment Terms: terms not yet applicable in this instance of BCAcq
- Minimum Discount and Minimum Purchase Amount: read-only fields for your reference
- SAN Suffix: SAN Suffix may be used with EDIFACT
- Shipping Method: the shipping method used by your vendor
-
Check the Use Enriched EDI box if your library receives shelf-ready material.
Check the Use vendor's cataloging service box if you want to receive full MARC records from your vendor for titles that don't already exist in the catalog.
- Add contact and address information in the Contacts and Addresses tabs. This information is read-only and for your records only.
- Configure the EDI tab if this vendor will be used to submit orders and receive invoices via EDIFACT. Click the Create EDI button.
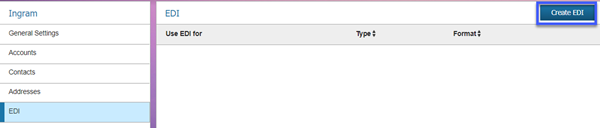
- Fill out the fields for each EDI entry.
- Use EDI For: select the type of EDI transactions for this EDI entry.
-
Type: select a type from the list depending upon your vendor configuration.
The type will default to Email. Change it to FTP for EDIFACT.
- Username and Password: enter the username and password your vendor has provided to you in order to access their FTP site.
- Hostname: enter the hostname for your vendor's FTP site.
- Server Directory: enter the directory, within the FTP site, where EDI files can be sent or retrieved.
- File Extension Override and Order File Prefix: enter these fields if required based on vendor configuration.
-
Send Title Metadata in Order File: check this box if your vendor requires title metadata to be sent in the order file. Midwest Tape is a vendor that requires title metadata.
When setting up an EDI entry for remittance (invoices), BCAcq searches for invoice files with the extension .inv by default. If the vendor uses any other file extension, enter it here in order to retrieve invoice files.
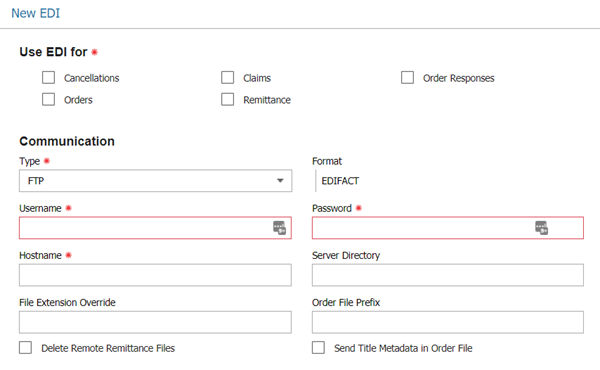
Click Create to save the EDI entry.
You will typically need 1 EDI entry for orders and 1 EDI entry for remittance (invoices).
Sample EDI entries for Baker & Taylor
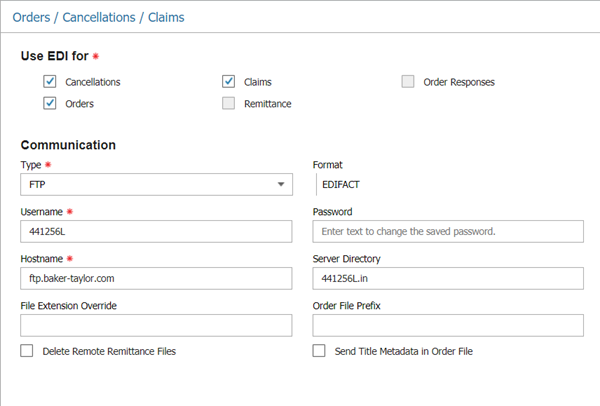
Note that Baker & Taylor uses the library SAN as the username.

Note that Baker & Taylor requires a File Extension Override entry of int.
Sample Email EDI entry
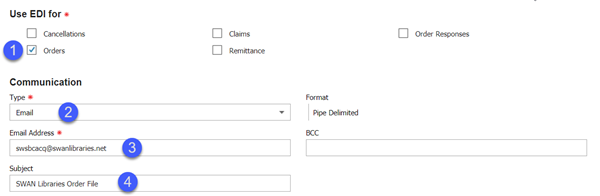
- Check the box(es) for the type of EDI entry.
- Select Email from the dropdown menu.
- Enter the email address for the vendor record you are modifying. This is the vendor's email where they will receive your order file.
- Enter a Subject for the email to be sent to your vendor each time you email an order file.