Main Content

BLUEcloud Acquisitions Selection Lists

You can use BLUEcloud Acquisitions (BcAcq) to import MARC (.mrc) files of titles to order and build a Selection List. Staff can review imported MARC records, select titles to order, and finally create orders in BcAcq. These orders are then approved, sent, and received just like any other order in BcAcq. Follow these steps to import a selection list, select titles, and create orders from the selected titles.

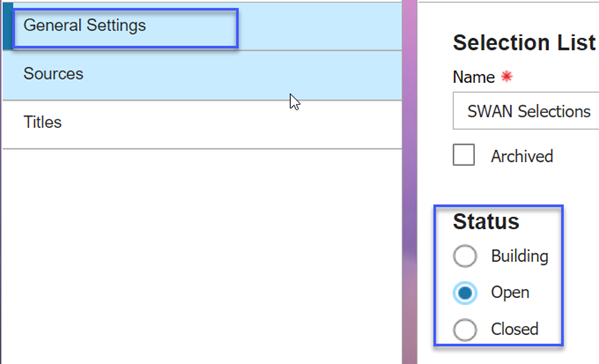
All selection lists must have a selection list type defined.SWAN uses the default SWAN Selection List type, which can be used by any library within the SWAN consortium. This selection list type is configured to do the following:

  • Flag repeated titles from selection lists of the same list type
  • Compare price for duplicate entries across vendors
  • Allow selectors to add entries to selection list

Set selector limits

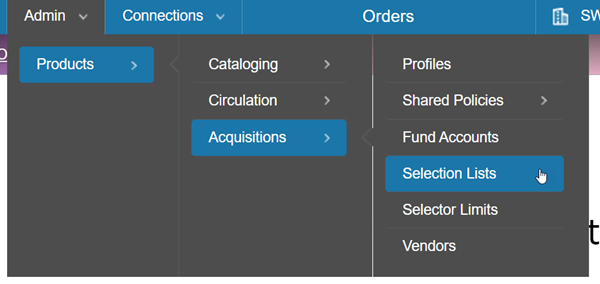
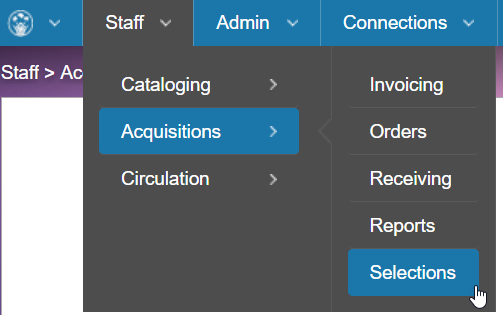
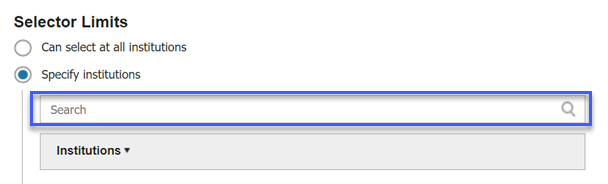
In order to build a Selection List, staff must be given permissions to access Selections. Staff must also be assigned Selector Limits. To access and configure Selector Limits for your library, navigate to Admin > Products > Acquisitions > Selector Limits.

selector-limits-1.png

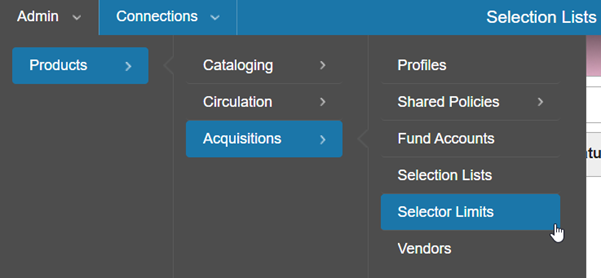
  1. A list of staff members for your institution will display. Click on each staff member to assign selector limits.
  2. Use the search box to find your library, and click on it to move it to the Institutions List.
    selector-limits-2.png
  3. Click Save.

Build a selection list

Once Selector Limits have been set for staff logins, staff can download MARC files of bibliographic records from vendors and build a Selection List in BcAcq.

Navigate to Admin>Products>Acquisitions>Selection Lists.

selection-lists-1.png

  1. Click Create Selection List to start a new list.
    selection-lists-2.png
  2. Enter a Name for the selection list.
  3. Choose a Type from the dropdown menu.
  4. The status will default to Building. You may change this directly to Open if you want to be able to approve titles in the list right away.
  5. Enter an Open Date. This field defines when the list should be considered active.
  6. Enter a Close Date. This field defines when the list should be considered closed.
  7. Click Create.
    selection-lists-3.png
  8. Click the Sources tab to begin importing files.
    selection-lists-4.png
  9. Click Import File.
    selection-lists-5.png
  10. Use the Browse button to find a MARC file on your local file system.
  11. Select a vendor record to assign to the file in the Vendor Override dropdown.
  12. The Source will automatically pull from the selected vendor record. 

Alternatively, you can skip the vendor override step and type the source directly into the box.

  1. Click Import.
    selection-lists-6.png
  2. The Status will show as Importing until it has finished and Complete when it is ready to view.
    selection-lists-7.png
  3. Repeat steps 9-13 to continue importing additional files. If you are done importing files, click on the Titles tab to view imported titles.
    selection-lists-8.png
  4. If the MARC files you imported contained duplicate titles, you can mark a title entry as Preferred.
  5. When you have finished adding titles to the selection list and are ready to move onto the Approval and Ordering steps, click on the General Settings tab and change the status from Building to Open.
    selection-lists-9.png
  6. Click Save.

Select titles

To select titles to order from a selection list, navigate to Staff>Acquisitions>Selections.

selections-1.png

A selection list must have a status of Open for it to display under Selections.

  1. Click on an open selection list to begin selecting titles.
    selections-2.png
  2. Click Edit Template to check the distribution template settings.
    selections-5.png
  3. Verify that your InstitutionItem TemplateFund Account, and Quantity defaults are set to the correct values. Click Save.
    selections-6.png
  4. Click Select Item to select a title to order.
    selections-3.png
  5. Change values pulled from the distribution template if needed.
    selection-l4.png

Click Add to add another distribution template to the order if the quantity to order is greater than 1.

Click Save as template to save newly selected values to the current distribution template.

  1. Continue to select titles to order until you are finished.

Saving occurs automatically as you select titles from the selection list. 

Create orders from a selection list

A selection list must have the status of Closed in order to create orders for selected titles.

Navigate to Admin > Products > Acquisitions > Selection Lists to change a selection list's status.

selection-lists-1.png

  1. Click on a selection list to mark as Closed.
  2. Click on the General Settings tab and change the Status from Open to Closed.
    selection-lists-10.png
  3. A pop-up message will warn you that this action cannot be undone. Click Yes to proceed.
  4. Closing the selection lists will make the Create Orders link appear. Click Create Orders to generate orders for selected titles.
    selection-lists-11.png
  5. The Order Creation section will show the status of generated orders as completed once the order creation has finished.
    selection-lists-12.png
  6. Orders have now been created for titles selected in that selection list. These orders will have a status of Building. They should now be approved and sent just like orders created manually or via 9xx Import. See the Approving Orders documentation for more information on how to complete these steps.